Tag Archives: BIND

BIND 10: Configuring DHCP for DHCPv4 Clients

The fourth article in my series covering BIND 10 has nothing to do (directly) with DNS. This one describes how to configure the DHCP4 component of BIND 10 to provided DHCP service for IPv4 clients in my lab network. I used bind10-1.0.0-rc.

There is quite an important caveat to note from the RC release notes:

As you can see, DHCPv4 clients must be connected to the DHCP server via a relay. As I have no Cisco devices on my home network running ip-helper or similar, I used dhcrelay to provide DHCP relay services. I configured my network as per the following diagram, utilising three CentOS 6.3 x86_64 VMs:

b10-dhcp4

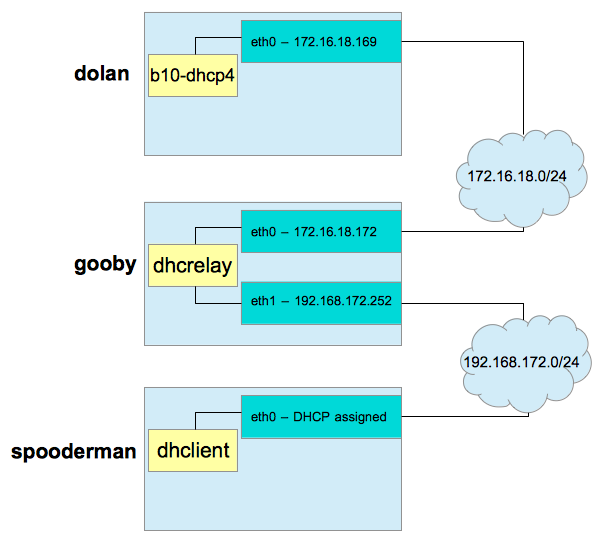
gooby will provide DHCP service to the 192.168.172.0/24 network via its eth1 interface. spooderman‘s dhclient will come online and make a multicast discovery request. dhcrelay on gooby will relay that message out of eth0 to dolan and b10-dhcp4. b10-dhcp4 will assign an IP address based upon configuration and current leases, and hand the offer back to gooby. dhcrelay will receive this offer, and relay it back out over eth1 via broadcast. spooderman will pick up this offer, and acknowledge it. Once b10-dhcp4 receives the acknowledgment, it commits the lease to the MySQL database. dhclient configures spooderman‘s eth0 interface, and the exercise is complete.

As 172.16.18.0/24 is my NATted network out of my test workstation, VMware provides its own DHCP service on the host OS - ensure this is shut down prior to commencing work. If your networks do not already run a DHCP service, you don’t need to worry about that - if they do, shut them down before proceeding (as long as this isn’t production :/) …

With the network planned and any existing DHCP services disabled, we can continue.

Continue reading

BIND 10: Zone Transfers, TSIG and DDNS

Note: This article was written alongside BIND 10 1.0.0-beta. See this article which covers the major differences to be aware of between 1.0.0-beta, and 1.0.0-rc.

The third article in my series detailing the newest DNS software release from ISC - BIND 10 - will cover the configuration of zone transfers and dynamic DNS, both secured with TSIG. This article assumes you know a little about the new architecture of BIND 10 (I’ve written about it here).

I have two servers configured for this as follows, both running BIND 10 built as per my first article in the series:

No BIND 10 modules other than the default have been enabled at this point, and the servers have been started for the very first time. First, we need to perform some configuration of our master DNS server - ns1.example.com.

Continue reading

BIND 10: Upgrading from 1.0.0-rc to 1.0.0 - The Production Release

After many years in development, and many releases (development, alpha, beta, release candidate), ISC have announced the final Production release of BIND 10 1.0.0. My previous article covered the upgrade from 1.0.0-beta to 1.0.0-rc. Aside from a database upgrade (which was clearly logged for our attention) the upgrade was very straightforward.

Let’s see if the upgrade from 1.0.0-rc to 1.0.0 is as easy.

Continue reading

BIND 10: How to Upgrade from 1.0.0-beta to 1.0.0-rc

Today, the first RC of BIND 10 was released. There are some new features that will change how you use my previous articles on this subject. Apart from a slew of bug fixes, there are some functionality changes that will affect both the installation and configuration of BIND 10. The BIND 10 Guide has also been updated to reflect these changes.

The major change of note is:

The previous versions of BIND 10 (I was using 1.0.0-beta previously) would have a master process - bind10. This Boss process was responsible for managing the state of other modules, restarting them when they fail, and so on. bind10 is now a shell script that fires up b10-init. This keeps the module names consistent, and we can now address the module as Init. Thus, a Boss shutdown now becomes Init shutdown, Boss show_processlist becomes Init show_processlist, config add /Boss/components b10-auth is now config add /Init/components b10-auth, and so on.

Continue reading

Securing DNS and Web Servers

In this introductory article, I will present several methods for helping to secure DNS and Web Servers. I am using BIND 9.9.4 and Apache HTTPD 2.4.6 on CentOS 6.4. BIND and HTTPD are by far the most common DNS and Web Server platforms. I will show how to build the software from source, as well as perform an initial secure configuration. I will presume a minimal installation of CentOS 6.4. If you’re using another Linux or UNIX variant, you will need to adjust the procedures accordingly. This article presumes that the reader is already familiar with DNS and Web Servers, particularly BIND and HTTPD.

Fully hardening these services is a very complex subject and we only touch on the major aspects of configuration below.

Continue reading

Installing chroot()ed BIND - Ubuntu 12.04 Server

This HOWTO will cover how to configure chroot()ed BIND under Ubuntu 12.04 Server. We want to chroot() BIND for security reasons - having software operate out of chroot() jails closes an avenue for exploit. I will be configuring a chroot() of /var/chroot/named.

First, install the bind9 and dnsutils packages. The former will provide the BIND software itself, whilst dnsutils provides utilities such as dig and nslookup that can be used to perform queries or troubleshoot your installation:

This will give us BIND 9.8.1-P1 at the time of writing this article:

It will also start BIND - so shut it down before proceeding:

Modify /etc/default/bind9. This file contains an OPTIONS variable whose contents are passed as options to named when it’s started. Add the -t option - which specifies the path to the chroot() jail:

Create the appropriate directories for the chroot() tree:

Move the default BIND configuration files to the chroot(), maintaining a symlink to the original location:

Create the null and random devices under the chroot(), and fix permissions:

Change ownership of the chroot() to the appropriate user and group, in our case bind:bind:

libgost.so from openssl-1.0.0 needs to be available under the chroot(), so create a bind mount for it. Add the folllowing to /etc/fstab:

Create the mountpoint under the chroot(), and mount:

We’ll need to create a syslog socket inside the chroot() so that BIND can find /dev/log where it expects it to be. Create /etc/rsyslog.d/60-bind-chroot.conf as follows:

The final step is to update our AppArmor configuration to allow reads and mmap calls on libgost.so, and reads on the BIND configuration files. Update the local AppArmor configuration as follows:

Reload the AppArmor profiles:

Now, we can start our chroot()ed BIND

and test:


BIND 10: Authoritative DNS Server

Note: This article was written alongside BIND 10 1.0.0-beta. See this article which covers the major differences to be aware of between 1.0.0-beta, and 1.0.0-rc.

In the previous article in the BIND 10 series, we saw how to build and install BIND 10, start it up (in the background), get it running as a designated user, connect to the command channel, and issue a command to shut BIND 10 down. In this article, we will see how BIND 10 needs to be configured to act as an authoritative DNS server. Further articles will deal with recursion, the DHCP components, and more as I investigate BIND 10 in more detail. I’m learning as I write too, so bear with me - BIND 10 is very new software, and is still in Beta stages of development - thus a lot of BIND 10 is still incomplete, or even where complete - incoherent - especially to a BIND 9 veteran like myself!

If you haven’t read the BIND 10: First Steps article, I suggest you go and do that now.

We will use bindctl to interact with the BIND 10 command channel. I’ve had a bit more time to dig into bindctl and what it actually does (and where it stores its configuration) so we will digress a little at first, and take a look at that.

Continue reading

BIND 10: First Steps

Note: This article was written alongside BIND 10 1.0.0-beta. See this article which covers the major differences to be aware of between 1.0.0-beta, and 1.0.0-rc.

I’ve been an avid BIND 9 administrator for many years, and have found its configuration to be straightforward and the software itself to be reliable and RFC compliant wherever I’ve taken the time to check RFC compliance. My only criticism of BIND 9 was not being able to easily and instantly provision new zones (e.g. requiring an rndc reconfig to add new zones), without the use of DLZ (Dynamically Loadable Zones). DLZ (http://bind-dlz.sourceforge.net) development stalled a long time ago, and the DLZ configuration was far from logical in my opinion. I moved away from BIND to PowerDNS for this very reason (I wanted zones provisioned instantly – i.e., as soon as they hit the backend DB, they’re live). However, with the new release of BIND being developed by ISC, everything is about to change – including the storage of zone data within a database. From the processes that actually comprise BIND to the configuration itself, it’s all different. BIND administrators are in for a big surprise the first time they get a chance to play with BIND 10. This article has been written to guide BIND administrators who have intermediate/advanced BIND 9 skills through their first steps with BIND 10.

BIND 10 will replace BIND 9 and ISC DHCP, and thus BIND 10 comprises processes to handle both authoritative and recursive DNS, as well as DHCPv4 and DHCPv6.

BIND 10 is still in development, and this article has been written around the current release (BIND 10 1.0.0 beta). SQLite is the only supported backend at present (except for DHCPv6 which confusingly supports only MySQL).

I’m sure ISC will release a coherent product as development continues, but in my opinion they have released a confusing and very incomplete beta version of BIND 10. The BIND 10 Guide (http://bind10.isc.org/docs/bind10-guide.html) is the current authoritative source of documentation, and the BIND 10 Wiki (http://bind10.isc.org/wiki) can be used to track development/releases.

I will do my best to give BIND 9 admins an interesting overview of getting BIND 10 up and running on a fresh CentOS install, and will demonstrate some of the features available, basic configuration, architecture of the new software and so on.

Stand by guys – it’s going to be odd. Very odd. I’ll be posting new articles as I learn more about BIND 10, so what you read in this article may be superseded by a later article (once I find a better/correct way of doing something, or BIND 10 itself changes).

Continue reading

How To Configure Solaris 10 BIND Chroot

Disclaimer: This post was originally posted in 2008 as an article on the now-defunct website zazzybob.com. While the software version and actual commands used may vary, the concepts are still similar and give a general idea of how to approach a given problem.

The default BIND installation in Solaris 10 does not run in a chroot environment, which is an obvious security risk. Starting BIND to run in a chroot environment is a no-brainer, but getting it to managed by SMF in Solaris 10 requires a bit more work …

Continue reading