The fourth article in my series covering BIND 10 has nothing to do (directly) with DNS. This one describes how to configure the DHCP4 component of BIND 10 to provided DHCP service for IPv4 clients in my lab network. I used bind10-1.0.0-rc.
There is quite an important caveat to note from the RC release notes:
|
1 2 3 4 5 6 7 8 9 10 11 12 |
This version of BIND 10 also includes the latest snapshot of the BIND 10 DHCP development. ... Features of these servers are: * Able to allocate and renew addresses, and handle lease expiration and releases. * Supports a subset of clients: - DHCPv4 clients connected to the server via a relay. - DHCPv6 clients on the same LAN as the server. ... |
As you can see, DHCPv4 clients must be connected to the DHCP server via a relay. As I have no Cisco devices on my home network running ip-helper or similar, I used dhcrelay to provide DHCP relay services. I configured my network as per the following diagram, utilising three CentOS 6.3 x86_64 VMs:
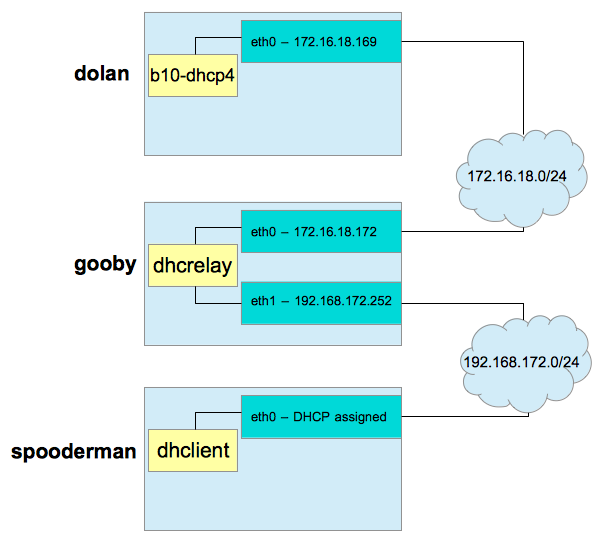
gooby will provide DHCP service to the 192.168.172.0/24 network via its eth1 interface. spooderman‘s dhclient will come online and make a multicast discovery request. dhcrelay on gooby will relay that message out of eth0 to dolan and b10-dhcp4. b10-dhcp4 will assign an IP address based upon configuration and current leases, and hand the offer back to gooby. dhcrelay will receive this offer, and relay it back out over eth1 via broadcast. spooderman will pick up this offer, and acknowledge it. Once b10-dhcp4 receives the acknowledgment, it commits the lease to the MySQL database. dhclient configures spooderman‘s eth0 interface, and the exercise is complete.
As 172.16.18.0/24 is my NATted network out of my test workstation, VMware provides its own DHCP service on the host OS - ensure this is shut down prior to commencing work. If your networks do not already run a DHCP service, you don’t need to worry about that - if they do, shut them down before proceeding (as long as this isn’t production :/) …
With the network planned and any existing DHCP services disabled, we can continue.
Building BIND 10
Prior to (re)building BIND 10 on dolan, you will need to have MySQL server installed (not strictly on the same server, but I did for simplicity’s sake), the MySQL libraries and the MySQL development files (headers and such).
Get the latest MySQL release via whichever package management system you use. I use CentOS, so yum it is:
|
1 |
# yum install -y mysql mysql-devel mysql-libs mysql-server |
Ensure that mysql_config is in PATH:
|
1 2 |
# which mysql_config /usr/bin/mysql_config |
Once the packages are correctly installed and mysql_config is located, BIND 10 can be built. If you’ve already built a BIND 10 install like me, back it up first after ensuring BIND 10 is shut down:
|
1 2 3 4 |
# cd /usr/local/bind10/bin # ./bindctl > Init shutdown # mv /usr/local/bind10-1.0.0-rc /usr/local/bind10-1.0.0-rc-NODHCP |
Change to your extracted source directory (I’ve compiled before) …
|
1 |
# cd /usr/local/src/bind10-1.0.0-rc |
and clear up the previous run:
|
1 |
# make clean |
Now, we can configure. The important option to note is --with-dhcp-mysql, which will look for mysql_config in the default PATH. If you have installed MySQL to a non-standard location, you will need to specify the absolute path to mysql_config, e.g.: --with-dhcp-mysql=/path/to/mysql_config.
|
1 2 3 4 |
# ./configure --prefix=/usr/local/bind10-1.0.0-rc-DHCP \ > --with-pythonpath=/usr/local/python3/bin/python3 \ > --with-botan-config=/usr/local/botan/bin/botan-config \ > --with-log4cplus=/usr/local/log4cplus --with-dhcp-mysql |
If you don’t have all those supporting applications already installed, you can read my first article to learn how to build and install them.
Once configure has completed successfully, you can compile and install the software:
|
1 2 3 4 |
# make # make install # rm -f /usr/local/bind10 # ln -s /usr/local/bind10-1.0.0-rc-DHCP /usr/local/bind10 |
As you can see, using a symlink pointed at your current version makes installation and rollback easy, and any existing scripts you’ve written will not need to be updated.
Configuring MySQL
In the previous section, MySQL was installed but left in an unconfigured state. Before we can move on to configuring DHCP under BIND 10, MySQL must be initialised and configured, and the appropriate schema loaded. It would help to have some MySQL skills so you know what’s going on if anything doesn’t work as expected.
Initialise the MySQL system tables first, using mysql_install_db. If you’ve not changed the MySQL datadir, then this will be /var/lib/mysql on a RHEL-derived system:
|
1 |
# mysql_install_db |
MySQL can now be started. Whilst I added the mysqld service via chkconfig, I disabled the option to have it start at boot. If I started all my services automatically on the lab systems, they’d be a little busy …
|
1 2 3 |
# chkconfig --add mysqld # chkconfig mysqld off # service mysqld start |
As soon as MySQL is up, define a root password - it’s blank to begin with:
|
1 |
# mysqladmin -u root password 'newpassword' |
You might want to use something better than newpassword for the new password. Connect to the MySQL monitor as root using the newly defined password:
|
1 2 |
# mysql -u root -p mysql> |
Next, create the database:
|
1 2 3 4 5 |
mysql> CREATE DATABASE b10dhcp; mysql> USE b10dhcp; mysql> SOURCE /usr/local/bind10/share/bind10/dhcpdb_create.mysql; mysql> GRANT ALL ON b10dhcp.* TO 'b10user'@'localhost' IDENTIFIED BY 'b10pass'; mysql> EXIT; |
I created a database called b10dhcp, connected to it, and sourced in dhcpdb_create.mysql, distributed with the BIND 10 release. Once the schema was created, I granted all privileges on the b10dhcp database to b10user, who may only connect from localhost using the password b10pass.
Attempt a connection as the newly created user to ensure there are no issues:
|
1 2 |
# mysql -u b10user -p -h localhost b10dhcp mysql> EXIT; |
MySQL configuration is now complete, and we’re ready to configure BIND 10.
BIND 10 Configuration for DHCPv4
Before configuring BIND 10, we’d better start it. I found that running BIND 10 as a non-privileged user (starts as root, binds to appropriate ports and then drops its privileges) as I do for BIND 10 when serving DNS (-u bind10) wouldn’t work when b10-dhcp4 tried to bind to port 67. The only way the port bind succeeded was by running the entire service as root - which wouldn’t be desirable if you were also hosting DNS from this instance:
|
1 |
# nohup /usr/local/bind10/sbin/bind10 & |
Next, as this is a fresh installation, I created a new user via b10-cmdctl-usermgr to administer the instance,
|
1 2 3 4 5 6 7 8 9 |
# cd /usr/local/bind10/etc/bind10 # /usr/local/bind10/sbin/b10-cmdctl-usermgr Desired Login Name:toki Choose a password: Re-enter password: create new account successfully! continue to create new account by input 'y' or 'Y': |
and connected via bindctl:
|
1 2 3 |
# cd ../../bin # ./bindctl > |
The b10-dhcp4 component is enabled and started next. This assumes the default message queue address of Dhcp4 as we define nothing else:
|
1 2 3 |
> config add Init/components b10-dhcp4 > config set Init/components/b10-dhcp4/kind dispensable > config commit |
We define kind dispensable so that b10-init can restart it if required. If you review the BIND 10 logs (in my case, nohup.out as I’ve not defined logging yet - the default is STDOUT) you will see messages along the following lines (if the startup is successful):
|
1 2 3 4 5 6 7 8 |
2013-02-16 17:40:19.123 INFO [b10-dhcp4.dhcp4/46955] DHCP4_STARTING server starting 2013-02-16 17:40:19.123 INFO [b10-dhcp4.dhcp4/46955] DHCP4_SERVERID_GENERATED server-id 172.16.18.169 has been generated and will be stored in /usr/local/bind10-1.0.0-rc-DHCP/var/b10-dhcp4-serverid 2013-02-16 17:40:19.123 INFO [b10-dhcp4.dhcpsrv/46955] DHCPSRV_MEMFILE_DB opening memory file lease database: type=memfile 2013-02-16 17:40:19.123 WARN [b10-dhcp4.dhcpsrv/46955] DHCPSRV_MEMFILE_WARNING using early version of memfile lease database - leases will be lost after a restart 2013-02-16 17:40:19.123 INFO [b10-dhcp4.dhcp4/46955] DHCP4_DB_BACKEND_STARTED lease database started (type: memfile, name: memory) 2013-02-16 17:40:19.124 INFO [b10-dhcp4.dhcpsrv/46955] DHCPSRV_MEMFILE_DB opening memory file lease database: type=memfile 2013-02-16 17:40:19.124 WARN [b10-dhcp4.dhcpsrv/46955] DHCPSRV_MEMFILE_WARNING using early version of memfile lease database - leases will be lost after a restart 2013-02-16 17:40:19.124 INFO [b10-dhcp4.dhcp4/46955] DHCP4_CONFIG_COMPLETE DHCPv4 server has completed configuration: |
Let’s review the standard Dhcp4 configuration:
|
1 2 3 4 5 6 7 8 9 10 11 12 13 |
> config show Dhcp4 Dhcp4/interface/ list (default) Dhcp4/renew-timer 1000 integer (default) Dhcp4/rebind-timer 2000 integer (default) Dhcp4/valid-lifetime 4000 integer (default) Dhcp4/option-def [] list (default) Dhcp4/option-data [] list (default) Dhcp4/lease-database/type "" string (default) Dhcp4/lease-database/name "" string (default) Dhcp4/lease-database/user "" string (default) Dhcp4/lease-database/host "" string (default) Dhcp4/lease-database/password "" string (default) Dhcp4/subnet4 [] list (default) |
All of these configuration items are described in the BIND 10 Guide so I will only describe what we change - you will need to review the various timing parameters specifically for your environment.
The first step is to define the backend MySQL datasource within the Dhcp4 configuration. Do this as follows:
|
1 2 3 4 5 6 |
> config set Dhcp4/lease-database/type "mysql" > config set Dhcp4/lease-database/name "b10dhcp" > config set Dhcp4/lease-database/host "" > config set Dhcp4/lease-database/user "b10user" > config set Dhcp4/lease-database/password "b10pass" > config commit |
We define Dhcp4/lease-database/host as an empty string - shorthand for localhost. It’s worth noting here that Dhcp4/lease-database/password is stored within the BIND 10 configuration (b10-config.db) in clear text. If no errors are noted during the commit, you should see a successful connection in the logs:
|
1 2 |
2013-02-16 17:42:43.340 INFO [b10-dhcp4.dhcpsrv/46955] DHCPSRV_MYSQL_DB opening MySQL lease database: name=b10dhcp password=***** type=mysql user=b10user 2013-02-16 17:42:43.352 INFO [b10-dhcp4.dhcp4/46955] DHCP4_CONFIG_COMPLETE DHCPv4 server has completed configuration: |
Any issues at this point should be traced. Check your MySQL GRANT statements and your BIND 10 Dhcp4 data source configuration.
The next thing to add is a subnet and an address pool to our BIND 10 configuration:
|
1 2 3 4 |
> config add Dhcp4/subnet4 > config set Dhcp4/subnet4[0]/subnet "192.168.172.0/24" > config set Dhcp4/subnet4[0]/pool [ "192.168.172.10 - 192.168.172.20" ] > config commit |
This is equivalent to the ISC dhcpd.conf configuration syntax:
|
1 2 3 |
subnet 192.168.172.0 netmask 255.255.255.0 { range 192.168.172.10 192.168.172.20; } |
A number of additional options are also required for DHCP to give the client enough information to be able to be networked correctly - such as routers, domain-name-servers, etc. I’ll define just two here - the aforementioned routers and domain-name-servers - but you should review the list of standard options in the BIND 10 Guide and ensure that all appropriate options are set for your environment (comparing with options set in your current dhcpd.conf if applicable):
|
1 2 3 4 5 6 7 8 9 10 11 12 13 14 |
> config add Dhcp4/subnet4[0]/option-data > config set Dhcp4/subnet4[0]/option-data[0]/name "routers" > config set Dhcp4/subnet4[0]/option-data[0]/code 3 > config set Dhcp4/subnet4[0]/option-data[0]/space "dhcp4" > config set Dhcp4/subnet4[0]/option-data[0]/csv-format true > config set Dhcp4/subnet4[0]/option-data[0]/data "192.168.172.2" > config commit > config add Dhcp4/subnet4[0]/option-data > config set Dhcp4/subnet4[0]/option-data[1]/name "domain-name-servers" > config set Dhcp4/subnet4[0]/option-data[1]/code 6 > config set Dhcp4/subnet4[0]/option-data[1]/space "dhcp4" > config set Dhcp4/subnet4[0]/option-data[1]/csv-format true > config set Dhcp4/subnet4[0]/option-data[1]/data "8.8.8.8, 8.8.4.4" > config commit |
With all appropriate Dhcp4 parameters defined, we can move on to dhcrelay configuration.
dhcrelay Configuration
On gooby, I’m running dhcrelay to pass requests between eth1 and eth0 and back again. This is very simple to achieve. Install the current ISC DHCP implementation; on RHEL-like systems this will install dhcpd, dhclient and dhcrelay:
|
1 |
# yum install -y dhcp |
Modify /etc/sysconfig/dhcrelay as follows:
|
1 2 3 4 5 6 7 |
# vi /etc/sysconfig/dhcrelay # Command line options here DHCRELAYARGS="" # DHCPv4 only INTERFACES="eth0 eth1" # DHCPv4 only DHCPSERVERS="172.16.18.169" |
Now, start dhcrelay:
|
1 2 3 |
# chkconfig --add dhcrelay # chkconfig dhcrelay on # service dhcrelay start |
The DHCP implementation is now ready to be put to work.
Boot the Client
spooderman is booted, but its network interface configuration has (deliberately) not been configured. Modify /etc/sysconfig/network-scripts/ifcfg-eth0 so it contains (at a minimum):
|
1 2 3 4 5 |
DEVICE="eth0" BOOTPROTO="dhcp" HWADDR=YO:UR:HW:AD:DR:00 NM_CONTROLLED="yes" ONBOOT="yes" |
Again, this presumes a RHEL-based system. Configure your network interface for DHCP via whichever mechanism is supported by your OS.
Restart your network service (or simply ifup eth0) and the DHCP transaction should occur.
You can perform the following steps on your dhcrelay server to watch the relaying occur:
|
1 2 3 4 5 |
# service dhcrelay stop # dhcrelay -i eth0 -i eth1 -d 172.16.18.169 Forwarded BOOTREQUEST for 00:0c:29:2f:bd:df to 172.16.18.169 Forwarded BOOTREPLY for 00:0c:29:2f:bd:df to 192.168.172.10 |
This will cause dhcrelay to operate in debug mode, and also run in the foreground. Here, we can see that the BOOTREQUEST is received and relayed to dolan. b10-dhcp4 then responds with the address and dhcrelay forwards the BOOTREPLY back to the host requesting the IP (and here we see the assigned IP - 192.168.172.10).
We can also use tcpdump to monitor the traffic - a simple trace of all appropriate interfaces on dolan and gooby were used to troubleshoot DHCP traffic:
|
1 |
# tcpdump -i <interface> -vvv port 67 |
Once you’ve verified that your client has an IP address
|
1 2 |
# ifconfig eth0 # cat /var/lib/dhclient/dhclient-eth0.leases |
you can check the MySQL database:
|
1 2 3 4 5 6 7 |
mysql> select count(*) from b10dhcp.lease4; +----------+ | count(*) | +----------+ | 1 | +----------+ 1 row in set (0.00 sec) |
We have a DHCPv4 lease! Digging further:
|
1 2 3 4 5 6 7 8 |
mysql> select * from lease4; +------------+--------+-----------+----------------+---------------------+-----------+ | address | hwaddr | client_id | valid_lifetime | expire | subnet_id | +------------+--------+-----------+----------------+---------------------+-----------+ | 3232279572 | )/?? | | 4000 | 2013-02-17 00:10:01 | 0 | +------------+--------+-----------+----------------+---------------------+-----------+ 1 row in set (0.00 sec) |
This is exact output - the deformation caused by the unprintable characters in the hwaddr field. Checking a DESCRIBE on the table:
|
1 2 3 4 5 6 7 8 9 10 11 12 |
mysql> describe lease4; +----------------+------------------+------+-----+-------------------+-----------------------------+ | Field | Type | Null | Key | Default | Extra | +----------------+------------------+------+-----+-------------------+-----------------------------+ | address | int(10) unsigned | NO | PRI | NULL | | | hwaddr | varbinary(20) | YES | MUL | NULL | | | client_id | varbinary(128) | YES | MUL | NULL | | | valid_lifetime | int(10) unsigned | YES | | NULL | | | expire | timestamp | NO | | CURRENT_TIMESTAMP | on update CURRENT_TIMESTAMP | | subnet_id | int(10) unsigned | YES | | NULL | | +----------------+------------------+------+-----+-------------------+-----------------------------+ 6 rows in set (0.00 sec) |
I guess this will stop us manually fiddling around with the database ![]() One thing I did note -
One thing I did note - b10-dhcp4 does not seem to honour a DHCPREQUEST when a client attempts to request an existing IP that has been leased to it. After three ifup/ifdown cycles on spooderman, b10-dhcp4 had reissued a new IP each time:
|
1 2 3 4 5 6 7 |
mysql> select count(*) from b10dhcp.lease4; +----------+ | count(*) | +----------+ | 3 | +----------+ 1 row in set (0.00 sec) |
Conclusion
This article has illustrated how to configure DHCPv4 under BIND 10, utilising a DHCP relay to pass client messages on to BIND 10 for address assignment.
This is the first publicly available release of BIND 10 to be able to offer leases to clients, hence there are some limitations around functionality (DHCPv6 appears to be a little further developed at present). There still seem to be a few kinks to iron out, but the functionality is definitely coming along.
Important Note for VMware Users
If you’re running your lab environment under desktop versions of VMware (Workstation, Fusion) you’ll need to place eth0 on your dhcrelay server into promiscuous mode (run tcpdump in the background, for example).
Hi Toki,
thanks for another good article.
I’ve also tripped over the use of the varbinary datatype in the database (see http://bind10.isc.org/ticket/2766), I hope that can be fixed.
BIND 10 is an open source project, so feedback from users to the development team is important.